组件、插槽与注入
一.组件
一个页面是有若干个组件组成的,这些组件各自完成自己的内容,并一起实现页面的功能。
1.组件组成
组件的最大优势就是可复用性。
当使用构建步骤时,我们一般会将vue组件定义在一个单独的.vue文件中,这被叫做单文件组件(简称SFC)。
组件的组成结构:
1
2
3
4
5
6
7
8
<template>
	<div>承载标签</div>
</template>
<script>
export default{}
</script>
<style scoped>
</style>
一个vue组件在使用前需要先被注册,这样vue才能在渲染模板时找到其对应的实现。组件注册有两种方式:全局注册和局部注册。
导入组件需要三个步骤,假定我们要导入../src/components/lesson2.vue路径下的文件:
1
2
3
4
5
6
7
8
9
<template>
  <lesson2/>
</template>
<script>
import lesson2 from '../src/components/lesson2.vue'
export default{
  components:{lesson2},
}
</script>
可以看出,第一步是通过import关键字将对应路径下的文件引入。
1
import 组件名 from 'vue文件路径'
之后需要export将该组件注入
1
2
3
4
5
6
7
<script>
export default{
	components:{
        组件名,
    }
}
</script>
注意,组件名其实是一个键值对,但由于键与值的内容一致,因此直接省略。
也可以在<script>标签内添加setup,即<script setup>,便可默认注入组件。
上述的这种方式即为局部注册。
全局注册则在vue的目录下通过更改main.js文件的内容来进行全局注册。
1
2
import lesson2 from '/components/lesson2.vue'
app.component('lesson2', lesson2)
最后是显示组件,需要再模版中加入对应组件的标签,如果组件名为多个单词,可以使用驼峰命名法,也可以直接用-连接。
1
2
3
<template>
  <lesson2/>
</template>
最后解释一下<style>标签内的scoped关键字
scoped关键字限制了当前的<style>样式仅在当前组件内生效,而非全局生效。
2.组件嵌套
组件允许我们将页面划分为独立的、可重用的部分,并且可以对每个部分进行单独的思考。在实际应用中,组件常常被组织成层层嵌套的树状结构。
这和我们嵌套HTML元素的方式类似,vue实现了自己的组件模型,使我们可以在每个组件内封装自定义内容与逻辑。
3.组件数据传递
组件与组件之间不是完全独立的,而是有交集的,是可以传递数据的。
传递数据的解决方案就是props
假定存在一个组件parent.vue的内容如下:
1
2
3
4
5
6
7
8
9
10
11
12
13
14
15
16
17
18
19
20
<template>
  <form>
    <input v-model="message">
  </form>
  <child :msg="message"/>
</template>

<script>
import child from './child.vue'
export default {
  components:{
    child,
  },
  data(){
    return{
      message:"",
    }
  }
}
</script>
如果我们要实现父子组件之间的数据传递,只需要在<child/>内添加对应属性,并在子组件内用props进行接收即可。
其child组件的内容如下:
1
2
3
4
5
6
7
8
9
10
11
12
13
14
<template>
  <p></p>
</template>

<script>
export default {
  data(){
    return{

    }
  },
  props:["msg"]
}
</script>
请注意:props传递数据,只能从父级传递到子级,不能反其道而行。
请注意,props获取的数据是只读的,不可以更改父级的数据。
| 关键字 | 作用 |
|---|---|
| type | 设置输入数据的类型,不符合则在控制台输出error |
| default | 设置传入数据的默认值 |
| required | 若未输入数据,则在控制台输出error |
我们可以通过在props的字段内增加特定字段type来限制数据的类型。
1
2
3
4
5
6
7
<script>
props:{
    msg: {
      type:[String,Number],
    }
  }
</script>
注意,这里我们可以选择只输入一个数值类型,也可以直接传入一个数组。
此时如果传入的数据不符合对应的类型,则会在控制台返回error。
我们也可以添加default字段来设置默认值,即当未传入参数时,会显示默认值。
1
2
3
4
5
6
7
8
<script>
props:{
  msg: {
    type:[String,Number],
    default:"0",
  }
}
</script>
这里要注意,如果要设置的默认值为数组或对象,则需要设置工厂函数。这里是vue2的语法,vue3已可以直接在default中设置数组。
1
2
3
4
5
6
7
8
9
10
<script>
props:{
  msg: {
    type:Array,
    default(){
      return ["Outer","Cyrex"]
    }
  }
}
</script>
之后是required关键字,若为传输数据则会在控制台输出error
1
2
3
4
5
6
7
8
9
<script>
props:{
  msg: {
    type:String,
    default:"OuterCyrex",
    required:true,
  }
}
</script>
4.组件事件
props实现了父组件传数据给子组件的途径,而如果我们想从子组件传递给父组件数据,则需要$emit来实现。
在组件的模板表达式中,可以直接使用$emit方法触发自定义事件。
触发自定义事件的目的是组件之间传递数据。
假定我们在child组件内声明一个函数,并委托给其父级组件parent来执行:
1
2
3
4
5
6
7
8
9
10
11
12
13
<template>
  <h3>Child</h3>
  <button @click="clickEvent">传递数据</button>
</template>
<script>
export default {
  methods:{
    clickEvent(){
      this.$emit('clickEvent')
    }
  }
}
</script>
则其parent组件的内容应为:
1
2
3
4
5
6
7
8
9
10
11
12
13
14
15
16
17
18
<template>
  <child @clickEvent="getData"/>
</template>

<script>
import child from './child.vue'
export default {
  components:{
    child,
  },

  methods:{
    getData(){
      console.log('getData used')
    }
  }
}
</script>
此处我们通过@clickEvent将两个组件联系起来。
我们也可以通过$emit向接收方传出数据,通常而言,第一个参数为该事件函数在parent内的名称,之后的参数便是要传输的数据内容。
请注意,$emit不一定要局限于methods方法,他可以写在任意函数内部,如watch侦听器函数。
1
2
3
4
5
6
7
<script>
methods:{
  clickEvent(){
    this.$emit('clickEvent',"OuterCyrex")
  }
}
</script>
此时,我们便可以在父组件中接受该参数并进行操作。
1
2
3
4
5
6
7
8
<script>
methods:{
  getData(str){
    console.log('getData used')
    this.msg = str
  }
}
</script>
如果出现警告内容,我们可以在emits对象内声明对应的组件。
1
2
3
4
5
6
7
8
9
10
<script>
export default {
  methods:{
    clickEvent(){
      this.$emit('clickEvent',"OuterCyrex")
    }
  },
  emits:["clickEvent"]
}
</script>
二.透传
透传,即属性继承,指的是传递给一个组件,却没有被该组件声明为props或emits的attribute或者v-on事件监听器。最常见的例子就是class 、style和id。
当一个组件以单个元素为根作渲染时,透传的 attribute 会自动被添加到根元素上。
如下,我们在父组件内调用了<child/>并为其添加了class="child"的属性。
1
2
3
<template>
  <child class="child"/>
</template>
此时,如果child内有唯一根元素,则该属性便会继承到该唯一根元素上
1
2
3
4
5
6
<template>
  <h3>Child</h3>
</template>

//输出效果
<h3 data-v-8c7a0501="" class="child">Child</h3>
我们可以通过设置参数来关闭属性继承。
1
2
3
export default {
	inheritAttrs:false
}
再次强调,这种属性继承仅支持子组件有唯一根元素的情况。
三.Slots插槽
1.创建插槽
我们已经了解到如何传输javascript中的数据,但如果我们需要传递模版内容,即HTML标签等,便需要使用到Slots,即插槽。
我们只需要将原来的单标签改为双标签,并在双标签内加入要插槽的模版内容即可。
下列代码是parent内的模版内容:
1
2
3
4
5
<template>
  <child>
    <p>我是Slot</p>
  </child>
</template>
此时我们便可以在子组件内使用<slot>标签多次调用该插槽了:
1
2
3
<template>
  <slot></slot>
</template>
其中:
此外,由于插槽是位于父组件内,其可以自由使用父组件的变量,并将渲染结果传递给子组件。
1
2
3
4
5
6
7
8
9
10
11
12
13
14
<template>
  <child>
    <p>{`{ msg }`}</p>
  </child>
</template>
<script>
export default {
  data(){
    return {
      msg:"我是动态的Slot内容"
    }
  }
}
</script>
此外,我们还可以为插槽设置默认值,只需要在<slot>标签内写入内容,则如果没传入数据便会默认使用<slot>内的内容。
1
2
3
4
5
<template>
  <slot>
    <p>我是默认值</p>
  </slot>
</template>
2.具名插槽
我们可以在插槽内通过设置v-slot的vue属性来限制插槽的使用。
通过v-slot,我们可以将插槽的一部分内容具名化,便于后续的调用。
1
2
3
4
5
<child>
  <template v-slot:header>
    <p></p>
  </template>
</child>
此时需要在子组件内取接收对应的slot,需要使用name属性,并与父组件中的v-slot的内容对应。
1
2
3
<template>
  <slot name="header"></slot>
</template>
其中,v-slot可以简写为#,即
1
2
3
4
5
6
7
<template>
  <child>
    <template #header>
      <p>{`{ msg }`}</p>
    </template>
  </child>
</template>
3.插槽数据传递
在某些场景下插槽的内容可能想要同时使用父组件域内和子组件域内的数据。要做到这一点,我们需要一种方法来让子组件在渲染时将一部分数据提供给插槽.
我们也确实有办法这么做!可以像对组件传递props那样,向一个插槽的出口上传递attributes
1
2
3
4
5
6
7
<template>
  <child>
    <template v-slot="slotObj">
      <p>{`{ msg }`}-{`{slotObj.msg}`}</p>
    </template>
  </child>
</template>
此处v-slot获取到的slotObj是一个对象,其内部包含所有子组件返回的数据。
请注意,这里的v-slot与具名插槽的名字的v-slot不一样,前者是标签的真实属性,即需要用=连接,而后者是vue定义的属性,是用:连接,且前者不可简写为#。
其子组件则是按照如下方式书写:
1
2
3
4
5
6
7
8
9
10
11
12
<template>
  <slot :msg="message"></slot>
</template>
<script lang="ts">
export default {
  data(){
    return {
      message:"Hello,World!"
    }
  }
}
</script>
此外,如果该插槽是具名插槽,则需要使用以下的语法
1
2
3
4
5
6
7
<template>
  <child>
    <template #child="slotObj">
      <p> - </p>
    </template>
  </child>
</template>
即v-slot:child="slotObj",或简写为#child,这样我们便可以为具名插槽传递数据。
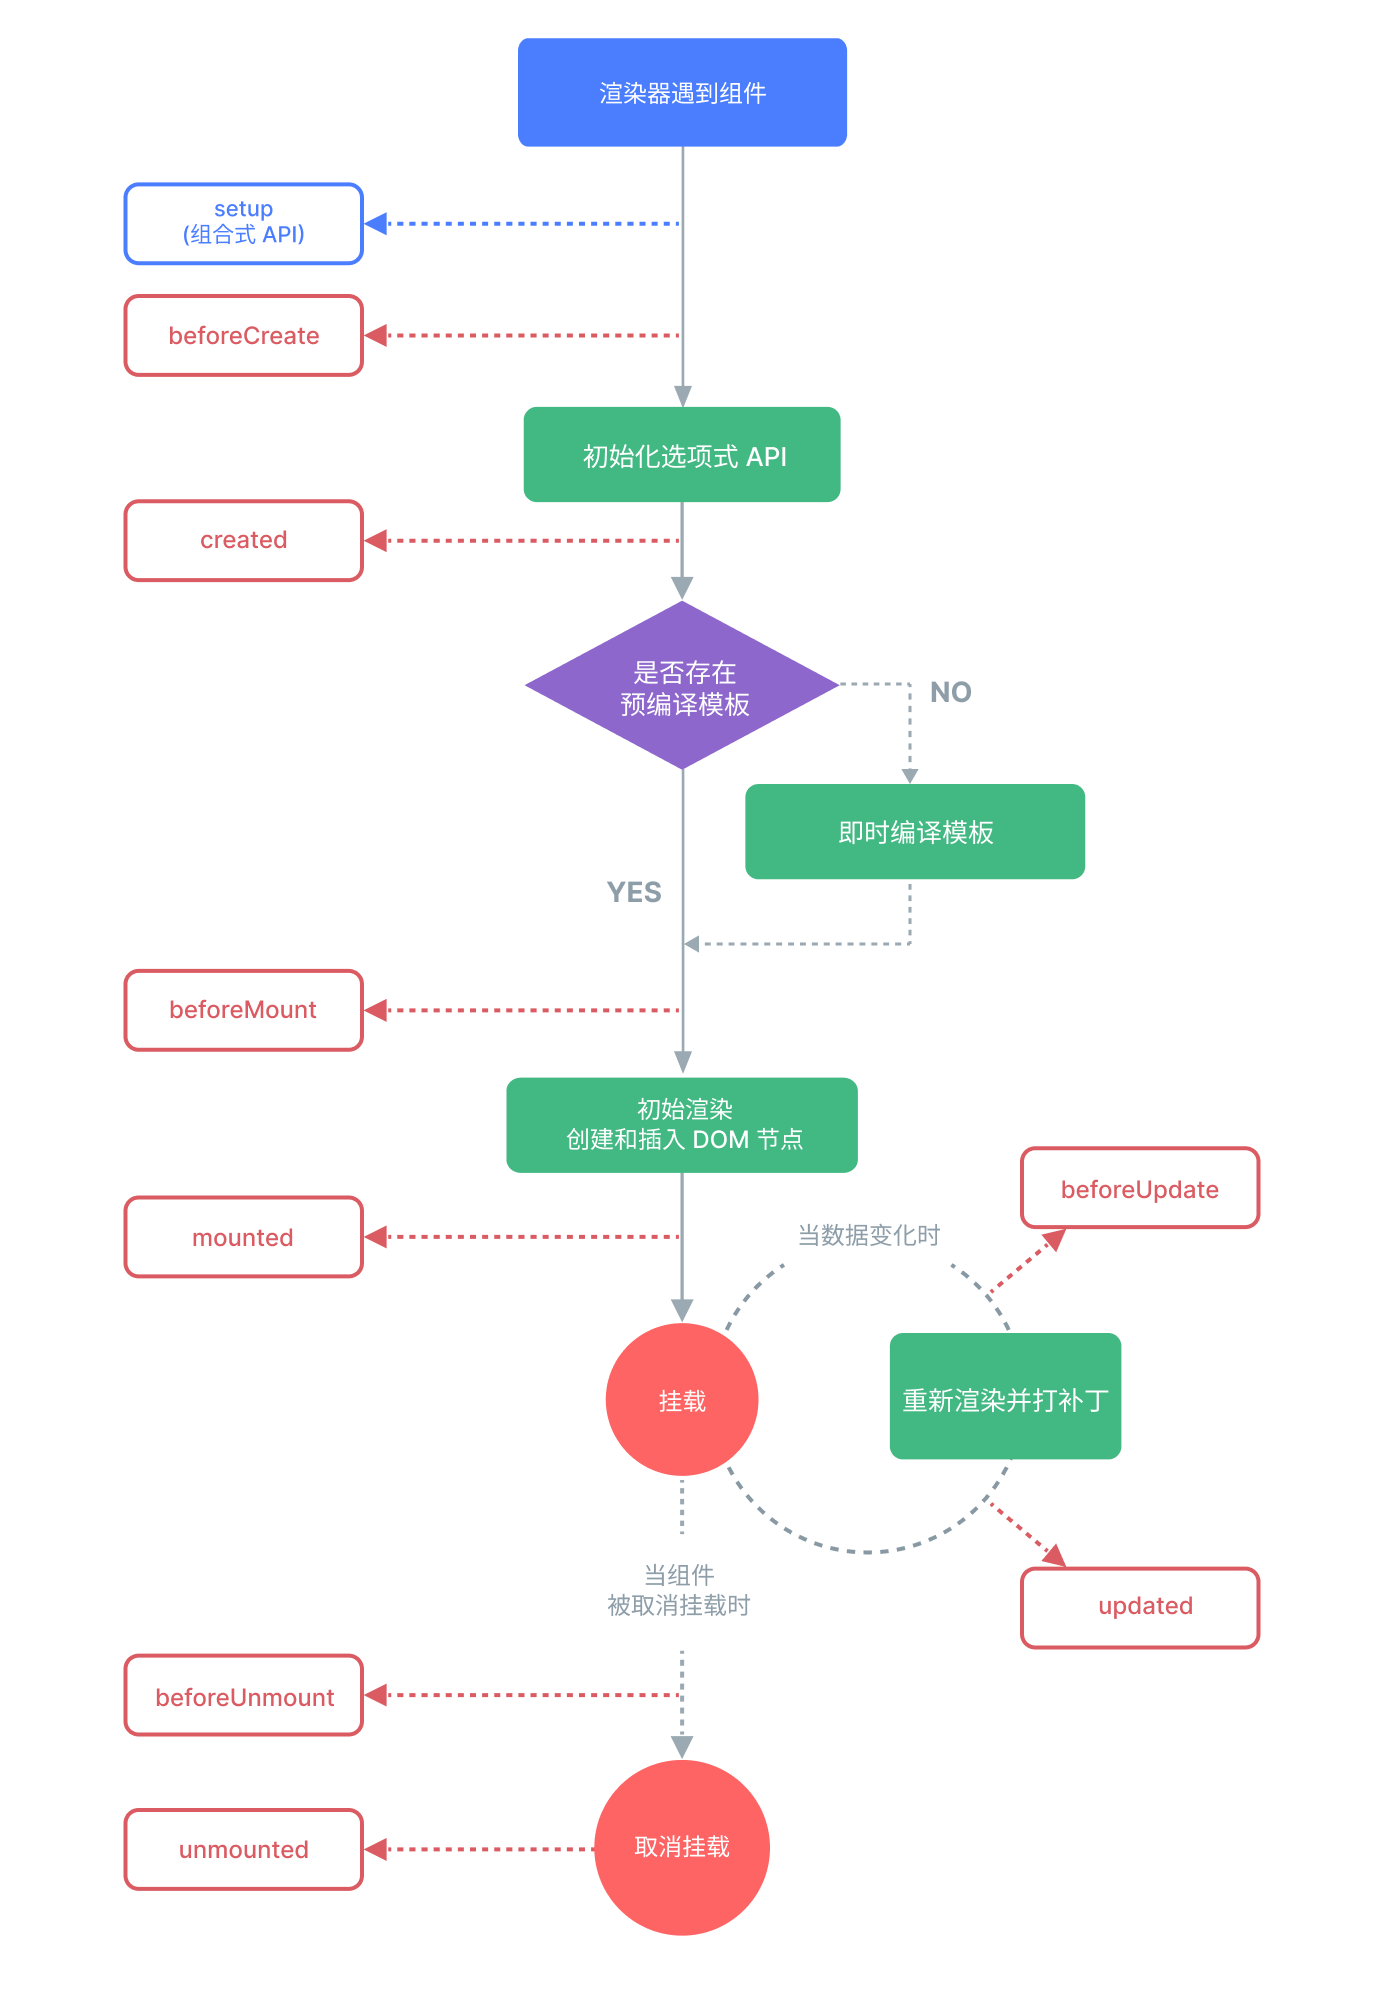
四.生命周期

如上图所示,一个组件的生命周期包括上述四个时期:
| 时期 | 对应Hook函数 |
|---|---|
| 创建期 | beforeCreate、created |
| 挂载期 | beforeMount、mounted |
| 更新期 | beforeUpdate、updated |
| 销毁期 | beforeUnmounted、unmounted |
其中,挂载即在模版中被渲染的过程。
五.动态组件
1.组件切换
动态组件可以根据用户的操作来决定组件的状态
假定我们有如下两个组件:
1
2
3
4
5
6
7
<template>
  <p>ComponentA</p>
</template>

<template>
  <p>ComponentB</p>
</template>
则我们可以通过下述方式实现组件的切换:
1
2
3
4
5
6
7
8
9
10
11
12
13
14
15
16
17
18
19
20
21
22
23
24
25
<template>
  <component :is="buttonComponent"></component>
  <button @click="buttonClick">更换组件</button>
</template>

<script>
import comA from './comA.vue'
import comB from './comB.vue'
export default {
  data(){
    return{
      buttonComponent:"comA"
    }
  },
  components: {
    comA,
    comB,
  },
  methods:{
    buttonClick(){
      this.buttonComponent = this.buttonComponent == "comA" ? "comB" : "comA"
    }
  }
}
</script>
如上述代码所示,<component>中的:is属性可以决定当前的组件。即如果:is="ComponentA",那么当前的<component>便会显示<ComponentA>的内容。
2.keep-alive
当使用<component :is="..">来在多个组件间作切换时,被切换掉的组件会被卸载 (Unmounted)。
换言而之,每次我们切换后,组件都需要重新被渲染。
我们可以通过<keep-alive>组件强制被切换掉的组件仍然保持存活的状态。
1
2
3
4
5
6
7
<template>
  <keep-alive>
  <component :is="buttonComponent"></component>
  </keep-alive>

  <button @click="buttonClick">更换组件</button>
</template>
3.异步组件
通过设置异步组件,我们可以在需要该组件时再申请请求。
1
2
3
4
5
6
<script>
import { defineAsyncComponent } from "vue";
const comB = defineAsyncComponent(()=>
  import("./comB.vue")
)
</script>
注册异步组件的方法如上述代码所示。
六.依赖注入
通常情况下,当我们需要从父组件向子组件传递数据时,会使用props。
想象一下这样的结构:有一些多层级嵌套的组件,形成了一颗巨大的组件树,而某个深层的子组件需要一个较远的祖先组件中的部分数据。
在这种情况下,如果仅使用props则必须将其沿着组件链逐级传递下去,这会非常麻烦。
provide 和 inject 可以帮助我们解决这一问题,一个父组件相对于其所有的后代组件,会作为依赖提供者。任何后代的组件树,无论层级有多深,都可以注入由父组件提供给整条链路的依赖。
在祖宗组件内,我们可以设置provide的内容:
1
2
3
4
5
6
7
<script>
export default{
    provide:{
        message:"OuterCyrex"
    }
}
</script>
则在最底层的组件内,便可以通过inject来进行接收
1
2
3
4
5
6
7
8
9
<template>
<p>{`{ message }`}</p>
</template>

<script>
export default{
    inject:["message"]
}
</script>
此外,如果我们想从祖宗组件的data中获取变量并传给子组件,则需要写一个工厂函数。
1
2
3
4
5
6
7
8
9
10
11
12
13
14
<script>
export default{
    data(){
        return{
            msg:"OuterCyrex"
        }
    }
    provide(){
        return {
            message:this.msg
        }
    }
}
</script>
注意:provide与inject只能由上到下进行传递数据。
七.创建应用
每个vue应用都是通过createApp函数来创建新的应用实例
1
2
const app = createApp(App)
app.mount('#app')
其中,一个项目一定有一个根组件,可以认为是整个项目的入口。其余所有组件都是根组件的子组件。
1
2
3
4
5
import { createApp } from 'vue'
import App from './App.vue'

const app = createApp(App)
app.mount('#app')
其中mount实际是将该应用挂载。
此外,src目录下的assets实际放入当前项目的所有资源,如公共CSS和图像img等。